How to develop a Detector
An algorithm of object detection can be developed with following operations:
Create a folder inside the following path.
Create the class that implements the detector and tracker in separate files.
Create the executor.py file.
Create the configuration file configuration.ini.
Create the Dockerfiles.
Execute the test creation and execution procedure.
These operation will be described in following sections.
Executor creation
The executor implements the object detection and tracking algorithm on multiple sequential frames. The operations to be performed within the file are:
Import the classes that perform detection and tracking.
Define a class that extends the AbstractDetector abstract class, defined at this path.
Implement the extract_features method within the class. This method is invoked in the main interface, which manages all the installed detection algorithms, and cyclically receives the frames, which are the input stream to the DeepFramework, and a dictionary (executor_dict) that contains all the information needed to implement your own detection and and tracking algorithm. In short:

The executor_dict dictionary contains the following keys:
frame_idx: frame id received from the detector
vc_time: instant of time when the image is captured
frame_shape: frame size
frame_counter: counter of analysed frames
The method must return a list of Object type objects. The Object class is implemented at the following path. It presents the following interface:

The input parameters are: * rect: is an object of type Rect * points: is a list of objects of type Point * pid: is the object’s identifier. It can be set manually or it can be assigned automatically. It is set to None if whole_image is set to True and the pid field is not initialized. * whole_image: when set to True, indicates that the object is made up of the whole image. The coordinates of the bounding boxes and/or keypoints must initialize Rect and Point objects respectively. The classes have the following interfaces.


Example of function implementation:

Creation of dockerfiles
The following guidelines must be taken into account when creating dockerfiles:
The Dockerfile for creating Docker images that will only use the cpu should be called Dockerfile.cpu
The Dockerfile for creating Docker images that will use the gpu should be called Dockerfile.gpu
Supporting Docker images should be named Dockerfile.setup if any.
Modify the Dockerfiles according to the comments in the sample dockerfiles within the following path.
Creating configuration files
Create a configuration file with the ‘.ini’ extension in your detector folder. The file must contain the following information:
CATEGORY: indicates the type of object detected by the detector. It also constitutes the name associated with the detector.
PATH: path of the file containing the Executor class, relative to the object_extractors folder.
CLASS: Executor’s class name.
FRAMEWORK: the framework used by the detector in case of GPU use (None if no framework is used, otherwise you can choose between caffe, tensorflow and pytorch).
CUDA_VERSION: the version of cuda used in order to train the model (None if the algorithm can be executed in CPU mode only)
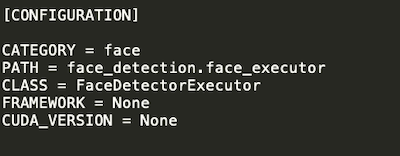
Example:
Case 1: The detector uses a framework but only in CPU mode or does not use any framework.

Case 2: The detector uses a framework (e.g. tensorflow) in GPU mode.

Example of a configuration file:
Creation and execution of tests
Once the detector development and configuration procedure has been completed, the test procedure must be carried out. Execute the following command:
python3 test_creator.py
This command generates the scripts to test all the algorithms (detection and feature extraction) installed on the platform. For detection algorithms, the tests are created in this path.
To run a test, from the main folder, run the desired script. Example:
./detector/detector_tests/test_scripts/my_test.sh
Before executing the script, it is necessary to put an image, called test_image.jpg, inside the detector folder, which will be used to verify the correct functioning of the algorithm developed.
How to develop a Descriptor
An algorithm of feature extraction can be developed with following operations:
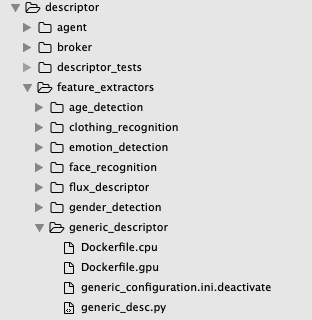
Create a folder within the path.
Inside the folder, create, in a dedicated file, the class that implements the descriptor as described in Class definition.
Inside the folder, create the descriptor configuration file, following these Configuration creation.
Create the Dockerfiles, as in this Creation of the dockerfiles.
Execute the test creation and execution procedure, as described in this Creation and execution of the tests.
Class definition
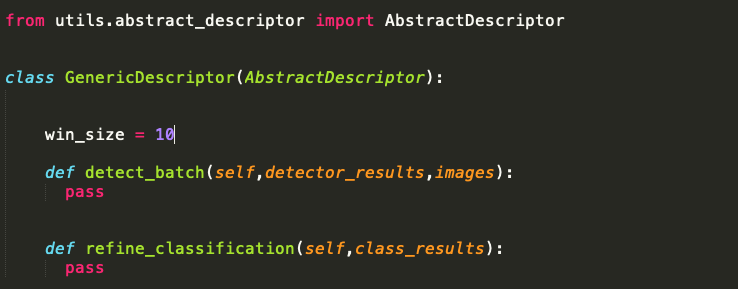
Each descriptor must extend the abstract class AbstractDescriptor, defined at the path.
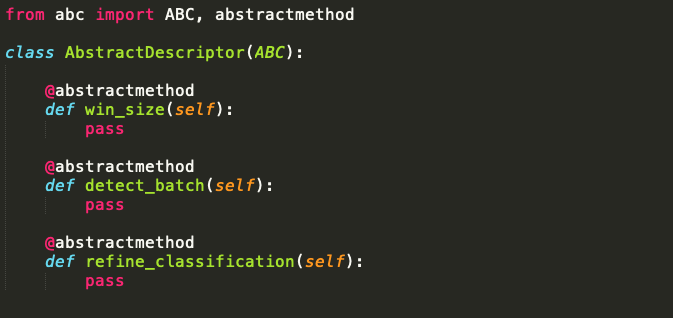
For this reason the Descriptor class should implement:
win_size: number of classification results that make up the time window on which an average will be averaged.
detect_batch: is the method that given the list of incoming images (crop of detector detected objects, images) and the list of detector detected objects (detector_results), must return their classification.
detector_results is the dictionary produced by the detector and contains the following values:
frame_idx: id of the frame analysed by the detector.
objects: list of objects detected by the detector in the frame_idx frame.
fp_time: timestamp that identifies the instant in which the detector produces its results.
vc_time: timestamp that identifies the instant of time in which the frame was captured.
frame_shape: frame size.
refine_classification: is the method that takes an input list of results (class_results) and returns the output results averaged over the maximum size of the time window on which they were captured represented by win_size.
class_results: is a list of results produced by detect_batch.
Example:
Configuration creation
The configuration file must be of type .ini and must contain the following fields:
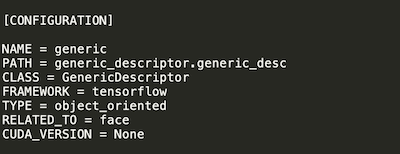
NAME: name associated with the descriptor
PATH: path of the file containing the descriptor class, relative to the feature_extractors folder
CLASS: class name of the descriptor
FRAMEWORK: framework used by the descriptor (None if no framework is used, otherwise you can choose between caffe, tensorflow and pytorch)
RELATED_TO: indicates which detector the descriptor is associated with. Enter the name of the detector category.
CUDA_VERSION: the version of cuda used in order to train the model (None if the algorithm can be executed in CPU mode only)
TYPE: can take two values:
object_oriented: the descriptor extracts a property of the object detected by the detector
image_oriented. the descriptor extracts an image property.
Example:
generic_configuration.ini
Creation of the dockerfiles
Inside your folder there must be at least one dockerfile for the creation of the component. In particular, a dockerfile must be prepared for each mode in which the descriptor is to be executed (cpu/gpu). The following guidelines must be taken into account when creating dockerfiles:
The Dockerfile for creating Docker images that will use only the cpu should be called Dockerfile.cpu
The Dockerfile for creating Docker images that will use the gpu should be called Dockerfile.gpu
Supporting Docker images should be named Dockerfile.setup if any.
Modify the Dockerfiles according to the comments in the example dockerfile at the path.
Creation and execution of the tests
Once the descriptor development and configuration procedure has been completed, the test procedure must be performed. Execute the following command:
python3 test_creator.py
This command generates the scripts to test all the algorithms (detection and feature extraction) installed on the platform. For feature extraction algorithms, the tests are created in the following path. To run a test, from the main folder, run the desired script. Example:
./descriptor/descriptor_tests/test_scripts/my_test.sh